• Don't miss out on all the fun! Register on our forums to post and have added features! Membership levels include a FREE membership tier.

Duners tunnel polishing "how to"

Thread Rating
5.00 star(s)

christopher

Well-known member
Staff member
Lifetime Membership
Nov 1, 2008
81,575
27,418
113
Rigby, Idaho
Maybe I just didn't catch the link, but Dunatic was kind enough to point me in the direction of a solution.

http://swmetal.com/

I tried two different buffers and could not get a cutting wheel to mount on either of them.

BUFFER ADAPTER 5/8”

Item59.gif


BUFFER ADAPTER 5/8”- FITS BUFF WITH 5/8” HOLE

Without this extension, there is no way to use any of the buffers out there.
the Wheel simply will not mount to them.
 
Last edited:

christopher

Well-known member
Staff member
Lifetime Membership
Nov 1, 2008
81,575
27,418
113
Rigby, Idaho
While trying to learn more about the different wheels out there I came across this...

===
http://chromeshopmafia.com/how_to/machine_polishing_with_bar_rouge/

MACHINE POLISHING WITH BAR ROUGE
EQUIPMENT AND SUPPLIES NEEDED
0002.jpg

BAR ROUGE
COMMONLY USED:
87 Stainless
TR-2 Brown Tripoli
Green Chrome
White Chrome
0006.jpg

POLISHING WHEELS:
AWR - Red Airway
AWY - Yellow Airway
AWp- Purple Lea Airway
AWW - White Airway Untreated
0008.jpg

COTTON MUSLIN BUFFS:
30 Ply
40 Ply
50 Ply
60 Ply
0012.jpg

SANDER / GRINDER MACHINE:
3,000 - 6,000 RPM
0010.jpg

PRO-40 PERFECTION METAL POLISH
MICRO FIBER POLISHING TOWELS

0004.jpg

SAFETY FIRST:
Always use safety flanges with any buffing wheel that has a metal center plate.


Step1: SAFETY FIRST
0007.jpg

Screw the threaded extender on to the machine spindle. Make sure the extender is securely tightened on the spindle.


0005.jpg

Lay the flat flange on the end of the extender.


0009.jpg

Place the Airway Buffing Wheel on the flat flange.


0011.jpg

Place the concave flange over the Airway Buffing Wheel so that the raised part of the flange fits into the hub of the buffing wheel.


0013.jpg

Place the concave washer, flat side down, into the recess of the concave flange.


0015.jpg

Use the flathead bolt and a 3/8” hex wrench to securely tighten the safety flange assembly and Airway Buffing Wheel to the extender and machine spindle.


0003.jpg

0001.jpg

For safety, always wear a respirator and face shield or goggles.
Step2: Using Rouge Bars
The 87 Stainles Rouge Bar is used for heavy cutting iron, steel, aluminum and stainless.

The TR-2 Brown Tripoli Rouge Bar is used for primary cutting stainless and aluminum.

The Green Chrome Rouge Bar is used for secondary cutting, semi-final finish, stainless and aluminum.

The White Chrome Rouge Bar is used for final finish, high lustre, stainless and aluminum.


Step3: START THE POLISHING PROCESS (CUTTING)
0016.jpg


For safety purposes, hold the rouge bar down firmly on the ground with your foot. Touch the rouge bar with the outside edge of the rotating buffing wheel until rouge adheres to the wheel. The rouge bar should be placed on white paper or cloth to keepit clean.


0017.jpg
0018.jpg

Start at one end of the fuel tank. Use TR-2 Brown Tripoli or Green Chrome rouge and Yellow Airway Cutting Wheel.


0019.jpg

The shine is created by letting the buffing compound do the cutting and polishing, not by how much pressure is applied against the metal surface. Polish your fuel tank by sections. Start from the topor bottom. Use a smooth left to right polishing motion. Make several passes to create a clean shine, using overlapping motion.


Step4: CLEANING AND FINISHING
0020.jpg

Replace the cutting wheel with a white finishing wheel and use the same basic motion and direction as the cutting process.


Step5: FINAL WIPE DOWN
0022.jpg

0021.jpg

After cutting and finishing, the tank is still dusty and pores filled with caked oxidation residue. To remove without marring finish, apply liquid PRO-40 PERFECTION METAL POLISH with MICRO FIBER TOWEL. Rub until surface becomes dark. Let dry and wipe off to a clean brilliant shine with a soft, dry MICRO FIBER TOWEL.
 

christopher

Well-known member
Staff member
Lifetime Membership
Nov 1, 2008
81,575
27,418
113
Rigby, Idaho
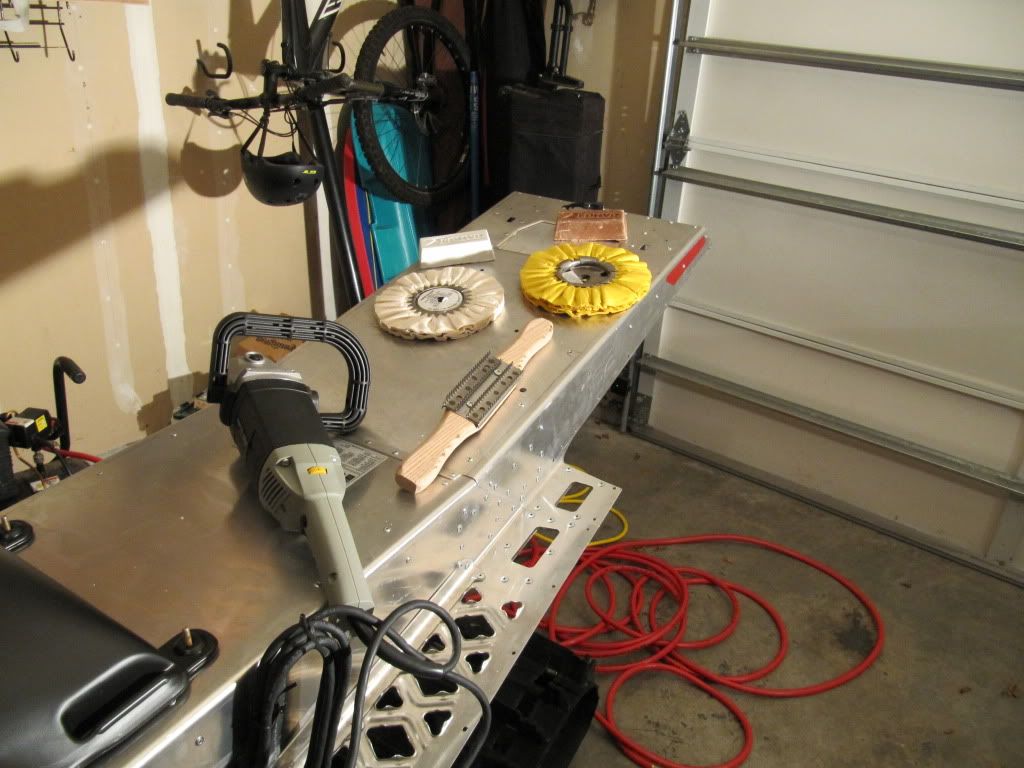
I see you say you have 8-10 hours in which I don't doubt, but just some food for thought, to cut down on your time per sled you can start out with a different wheel(s). What I do is go down to the Peterbilt or Kenworth dealership and pick up an Orange, Yellow, and White wheels. The orange wheel is your cutting wheel. Cutting a tunnel will take 20 mins with the brown rouge, then I go to the Yellow with brown rouge, then white wheel with either white or blue rouge.


Is this the combination he was speaking about...??
http://www.zephyrpro40.com/s2/Scripts/prodList.asp?idCategory=78

101 ORANGE RUFFY CLEAR DIP
(AWO 58-8 CD)
Very heavy cutting mill treated cloth, chemically dipped, for iron, steel, aluminum & stainless steel
5/8" A.H. - 8"
$15.00


205 YELLOW AIRWAY MILL TREAT
(AWY 58-8 MT)
Medium to heavy cutting mill treated cloth for aluminum & stainless steel
5/8" A.H.- 8"
$11.90


401 WHITE AIRWAY UNTREATED
(AWW 58-8 HR)
Final finish or coloring buff, high lustre for aluminum and stainless steel
5/8" A.H. - 8"
$11.90


501 WHITE DOMET FLANNEL
(AWW 58-8 FL)
Very high finish and lustre for aluminum and stainless steel
5/8" A.H.- 8"
$12.45


Dunatic

MODERATOR: Paid Premium Member
Staff member
Premium Member
Jan 24, 2003
1,687
753
113
51
Plain City, Utah
I also order some stuff from caswellplating.com and bright-works.com

Swmetal is close and always gets here really fast.

Thunderguyboosted, of you want, we come to Canada all the time, if you want me to get what you want and bring it up, let me know...
 
G

green_denali

Active member
Dec 14, 2009
172
39
28
Anchorage, AK
adapter

Where did you see this adapter at, I looked on swmetal website but didnt see it. I jsut put the pad on thebuffer without the adapter and it worked just fine, the pad never slipped while I was using it. Ill take a picture of how I had mine set up. I did this because I couldnt find that adapter anywhere. Christopher or Dunatic, where did you see this and where did you order it. I dont see a part# for it either.

Maybe I just didn't catch the link, but Dunatic was kind enough to point me in the direction of a solution.


http://swmetal.com/

I tried two different buffers and could not get a cutting wheel to mount on either of them.

BUFFER ADAPTER 5/8”

Item59.gif


BUFFER ADAPTER 5/8”- FITS BUFF WITH 5/8” HOLE

Without this extension, there is no way to use any of the buffers out there.
the Wheel simply will not mount to them.
 

christopher

Well-known member
Staff member
Lifetime Membership
Nov 1, 2008
81,575
27,418
113
Rigby, Idaho
Where did you see this adapter at, I looked on swmetal website but didnt see it. I jsut put the pad on thebuffer without the adapter and it worked just fine, the pad never slipped while I was using it. Ill take a picture of how I had mine set up. I did this because I couldnt find that adapter anywhere. Christopher or Dunatic, where did you see this and where did you order it. I dont see a part# for it either.
Like Mtn Ryder linked.
I took the photo from Zephyr because it was so much clearer than the image on swmetal
 
G

green_denali

Active member
Dec 14, 2009
172
39
28
Anchorage, AK
no 5/8" buffer adapter?

Since I had no adapter at the time I polished my sled, I just improvised. I bought a 5/8" washer from Lowe's, put it on the buffer, put the pad on, and then screwed on the backing nut that came with the buffer, and then tightened it up with 2 crescent wrenches. I had no problems with the pad slipping with this setup at all. Although having that extesion would be more preferable, this setup will still get the job done. One thing to note is that you might want to put some tape over the backing nut , or just be careful not to let it rub on the tunnel. I also had to drill out the hole on both pads (just a little) so that they would fit on the buffer.

CIMG1110.jpg CIMG1111.jpg CIMG1114.jpg CIMG1113.jpg CIMG1112.jpg CIMG1115.jpg CIMG1105.jpg
 
T

Thunderguy BOOSTED

Well-known member
Oct 5, 2008
1,324
68
48
Bc Canada
I also order some stuff from caswellplating.com and bright-works.com

Swmetal is close and always gets here really fast.

Thunderguyboosted, of you want, we come to Canada all the time, if you want me to get what you want and bring it up, let me know...

Hey Dunatic! that would be awesome! I sent you a PM!

Thanks:canada:
 

christopher

Well-known member
Staff member
Lifetime Membership
Nov 1, 2008
81,575
27,418
113
Rigby, Idaho
Since I had no adapter at the time I polished my sled, I just improvised. I bought a 5/8" washer from Lowe's, put it on the buffer, put the pad on, and then screwed on the backing nut that came with the buffer, and then tightened it up with 2 crescent wrenches..
That is what I tried.
But the post on my buffer is SO short, that I could not get the nut to go on after the wheel was in place. Without a proper extension, I couldn't make it work.
 
6

600xc4me

Well-known member
May 21, 2008
1,186
116
63
La Crete Alberta
What kind of buffers are you guys using? I would like to buy one so I don't have to borrow. But the one I borrowed is like a $300 variable speed rig. I don't want or need something that expensive. Any options?
 
G

green_denali

Active member
Dec 14, 2009
172
39
28
Anchorage, AK
The Zephyr kit, the one that is made to go with the buffing wheels with the metal center plate actually looks like a good kit. You could get that along with the 205 yellow cutting pad, and the 501 white domet flannel buffing pad, along with a bar of tripoli and a bar of jewelers rouge, and your in business. Then your tunnel will look like it was chrome plated.
icon10.gif


That is what I tried.
But the post on my buffer is SO short, that I could not get the nut to go on after the wheel was in place. Without a proper extension, I couldn't make it work.
 

christopher

Well-known member
Staff member
Lifetime Membership
Nov 1, 2008
81,575
27,418
113
Rigby, Idaho
What kind of buffers are you guys using? I would like to buy one so I don't have to borrow. But the one I borrowed is like a $300 variable speed rig. I don't want or need something that expensive. Any options?
I tried to go CHEAP...

http://www.harborfreight.com/power-tools/polishers/7-inch-electronic-polisher-66615.html


image_1875.jpg


Description of Chicago Electric Power Tools 66615
This 7" electronic polisher gives you all the power and control you need for a wide variety of applications. The strong 10 amp motor generates between 1000-3500 RPM for optimum polishing. The LCD display shows the speed and the textured grip side handle provides comfortable handling. The polisher comes with foam and polishing bonnets as well as an 80 grip sanding disc.


Sale: $54.99

  • Mounting disc type: 7” hook and loop
  • Variable speed switch
  • Easy-to-read LCD display
  • Strong 10 amp, soft-start motor
  • 1000-3500 RPM for optimum polishing
  • All ball and needle bearing construction for long life
  • Textured grip side handle
  • Includes a foam bonnet, polishing bonnet, and an 80 grit sanding disk
120 V, 60 Hz, 10 A Arbor: 5/8" x 11 TPI Wheel diameter: 7" Maximum accessory size: 7” dia. Power cord length: 7 ft. Overall dimensions: 17" L x 9" W x 5" H Shipping Weight: 8.8 lbs.
 
P

Powder Buster

Active member
Feb 3, 2009
142
34
28
Christopher-
How did that polisher work? Looking at the reviews at harbor freight it sounds like the quality is hit and miss. You have any trouble with it? Would rather spend more the first time if it's not going to last.

Thanks
 

christopher

Well-known member
Staff member
Lifetime Membership
Nov 1, 2008
81,575
27,418
113
Rigby, Idaho
Thats just it.
It didn't work at all
Because I did not have the little adapter.
So I still don't know if it will fill the bill or not at this point.

Duner is coming up here next week to give me a class on the fine art of Tunnel Polishing.

You can expect a new thread, with lots of photos and IN DEPTH commentary on all his secrets techniques!!
 
B

Bear North

Member
Aug 23, 2009
116
19
18
Skagway, AK & Snoqualmie, WA
Step 1 of 3 and a few hours into it already

Here are a few pics of step 1. This is just after the brown bar.

Also for those that have not purchased a polisher I suggest getting one that you can lock the trigger for constant application. Its a long process and this helps.

Before and Kit
IMG_1375.jpg


After step 1
IMG_1384.jpg


Its a good thing that this is a holiday today and not too many people are at work because yes you will have eye shadow when you are done :face-icon-small-coo

More pics to come
 
Premium Features