
I've got a lot of Pm's on this from an old post.
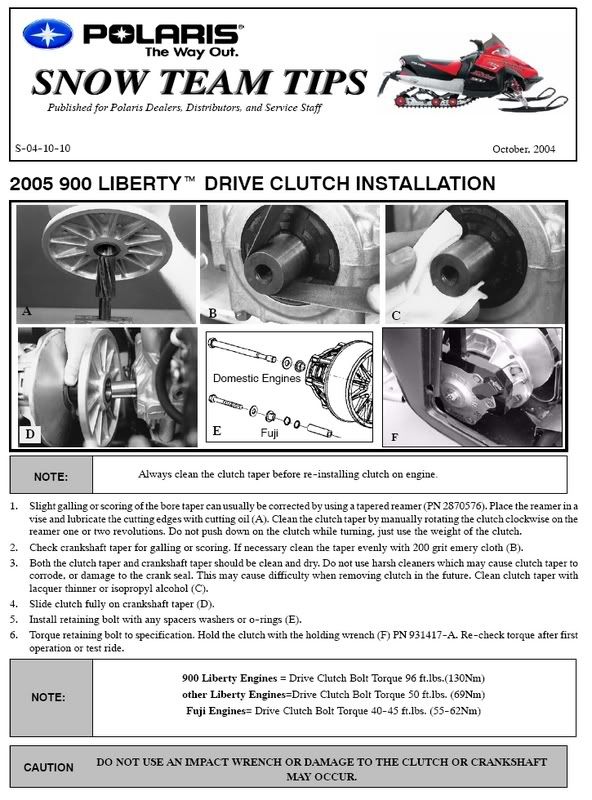
Here is the install procedures on the 900's primarys... note that the old spec of 50 ft lbs is not correct for these engines... before you ask, I do not know about the new dragons and 700... The proper torque spec is 96 ft/lbs.
Some tips: NEVER use an impact to remove or install the primary. Always use a proper clutch holding tool to remove the bolt and tighten, buy hand-wrench, the removal tool.
This is not a wives tale... the snouts on the cranks can develop stress cracks that can cause big problems later down the line.... Don't listen to those that say "I've been using an impact for years on the clutches without a problem.....". Just not a good idea given the cost of a crank and the relative ease of taking a few extra moments to do it correctly.")
Here is the install procedures on the 900's primarys... note that the old spec of 50 ft lbs is not correct for these engines... before you ask, I do not know about the new dragons and 700... The proper torque spec is 96 ft/lbs.
Some tips: NEVER use an impact to remove or install the primary. Always use a proper clutch holding tool to remove the bolt and tighten, buy hand-wrench, the removal tool.
This is not a wives tale... the snouts on the cranks can develop stress cracks that can cause big problems later down the line.... Don't listen to those that say "I've been using an impact for years on the clutches without a problem.....". Just not a good idea given the cost of a crank and the relative ease of taking a few extra moments to do it correctly.

